In the world of piping design engineering, clear and precise visual communication is crucial. Engineers, designers, and fabricators must interpret detailed pipe drawings to bring complex piping systems to life. In this field, the most regularly utilised types of technical drawings include isometric vs orthographic drawings of pipes.
The two styles play varied but complementary roles in the design and application of the mechanical systems. Learning about the difference between isometric and orthographic drawing of pipes is important to the people providing design engineering services or employed in companies dealing with mechanical engineering.
Let us discuss the peculiarities, uses and significance of each one of them.
What are Isometric Pipe Drawings?
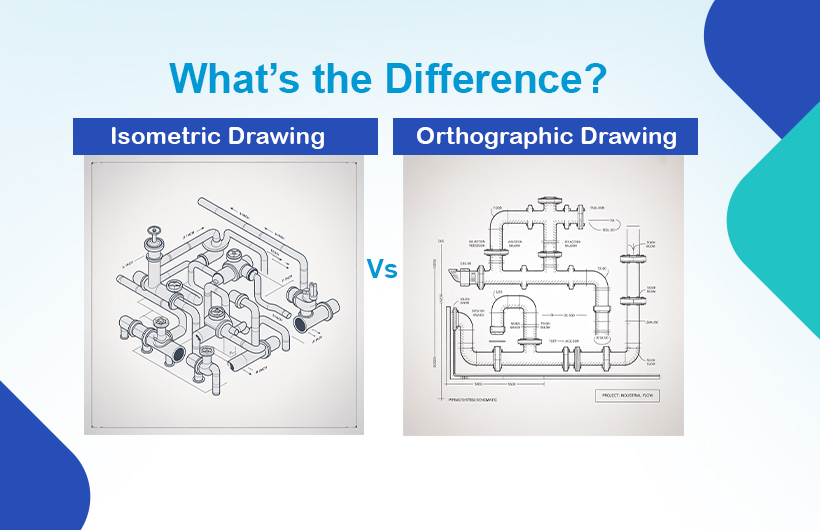
Isometric drawings are an example of the three-dimensional presentation of a piping system on a two-dimensional paper. The major characteristic of isometric drawing is that it displays the layout of the piping in the physical space. All lines are angled at 30 degrees to give 3D effects, and viewers can imagine the depth, width and height of the system at the same time.
Key features of Isometric drawings:
- 3D Representation: Provides a portrayal of the reality of the piping system layout.
- Ease of Interpretation: Provides clearer spatial knowledge to those in on-site construction teams.
- Plain Detailing: The different sections of a pipe are distinctly illustrated and have precise measurements and directions of flow.
- Not to Scale: Classical However, as the dimension is precise, the drawing might not necessarily be drawn to scale.
Common Uses:
- Installation and fabrication
- Visualization/site layout in the site layout view, the viewer must assess the overall performance of the layout, so it is important that the visual quality meets the expectation.
- Organization of fieldwork
What Are Orthographic Pipe Drawings?
Orthographic drawings, on the other hand, break down the 3D system into 2D views—typically the front, top, and side. Each view focuses on a single plane, allowing for exact scaling and precise technical detailing. These are widely used in engineering design documentation and are foundational for any mechanical drafting process.
Key Features of Orthographic Drawings:
- 2D Planes: Includes front, top, and side views.
- Accurate Scaling: All dimensions are to scale, ideal for technical reference.
- Component Clarity: Shows exact locations and measurements of each component.
- No Perspective: Unlike isometric views, depth perception is absent.
Common Uses:
- Design approvals and documentation
- Internal review and engineering checks
- Fabrication and manufacturing detailing
- Cross-departmental communication
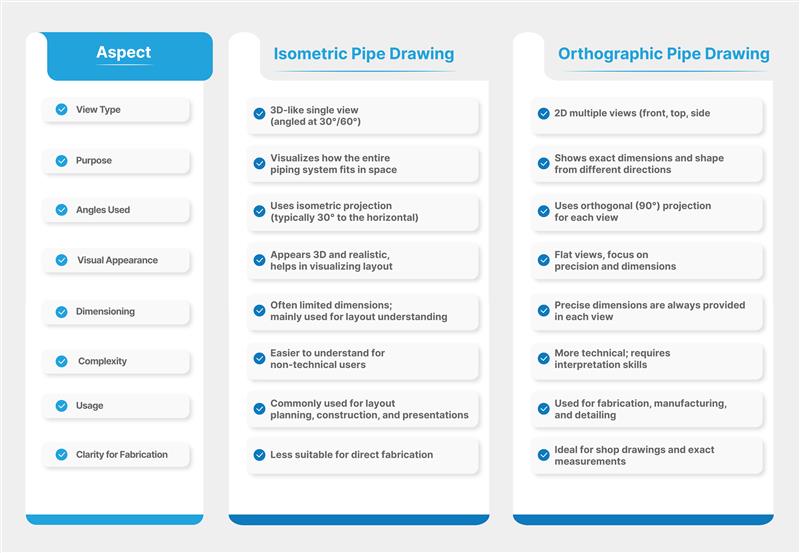
Isometric vs. Orthographic Pipe Drawing: Key Differences

In essence, isometric drawings provide a visual understanding, while orthographic drawings deliver precise, scalable technical data.
Why Understanding the Difference Matters
For any mechanical engineering company, especially those delivering designing engineering services, knowing when and how to use each drawing type is critical.
- The abilities of Field Technicians require isometric drawings to enable them to comprehend where the pipes can be fitted into each other.
- Design Engineers use the orthographic views in order to make proper placements of the parts.
- They both are used by Project Managers to coordinate the effort and prevent misunderstanding.
- Customers and stakeholders gain easy-to-interpret and consumer-friendly design images at various levels.
The two types of drawings are used in a well-integrated workflow such that engineering intent is matched with field execution.
Select the Appropriate Partner when designing Piping Engineering
Becoming familiar with the differences between the isometric and orthographic drawing of pipes is only half of the solution. The actual issue is getting these drawings done accurately, industry-regulated, and clearly. This is where the competence of a trustworthy engineering partner comes in handy.
Monarch Innovation is another institution name that is well looked upon in terms of mechanical and piping design engineering. Having a successful record of delivering high precision Isometric and Orthographic Drawings, Monarch implements the best of technical expertise and an understanding of the industry business to offer comprehensive engineering services to end-to-end business experts.
Regardless of whether you need sophisticated 3D modelling and construction-ready drawings or comprehensive documentation of the design, Monarch helps to complete your project with perfection, starting right at the concept phase and ending with a final product.
Final Thoughts
When it comes to the isometric vs orthographic debate, you can forget the winner because it always depends on the correct tool when it comes to the correct task. The two kinds of drawing are vital in the engineering services of modern piping design, and knowing how to understand their disparities enables successful cooperation and/or communication as well as flawless project implementation.
When you are prepared to enhance your mechanical designing steps to a new level, get affiliated with Monarch Innovation-where accuracy meets creativity in each line drawn.


